User Manual
Pivot++
Custom pivots for the Unity Editor. This guide covers setup and every feature, so you can start working with custom pivots in a few minutes.
1 · Introduction
Thanks for picking up Pivot++. This guide covers setup and every feature, so you can start working with custom pivots in a few minutes.
Pivot++ is an editor-only plugin that lets you move the transform handles of any object right in the Scene view. Instead of being stuck with the pivot baked into a mesh, you can move, rotate and scale objects around any point you choose:
- the corner of a door,
- the base of a lamp post,
- the hinge of a lid.
All without re-exporting models or adding empty parent objects. It lives in a small overlay inside the Scene view. It never touches your meshes, adds no components at runtime, and is stripped from every build. It is a pure editor tool.
1.1 · Key features
- Shared Pivot. Offset the handle for the current selection, bounded or unbounded.
- Bounded offsets. Set the pivot inside the object's bounds, so one setting fits meshes of any size.
- Unbounded offsets. Place the pivot at an exact distance in local space.
- Many pivots per object. Save as many as you need, all within reach while you work.
- Edit Pivots mode. Move, rotate and delete saved pivots right in the Scene view.
- Non-destructive. Your meshes, prefabs and hierarchy are never changed.
1.2 · Requirements
- Unity 2022.3 or newer.
2 · Getting Started
2.1 · Activating the Pivot++ overlay
Pivot++ is delivered as a Scene view overlay. To enable it:
- Focus the Scene view by clicking anywhere inside it.
- Press ` (the backtick key, above Tab) to open the Overlays Menu.
- Enable Pivot++ under the Custom foldout.
- The Pivot++ overlay appears in the Scene view. Drag it by its header and dock or place it wherever is comfortable.
2.2 · First steps
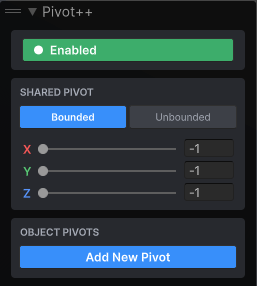
- Select any GameObject with a renderer in the Scene view or Hierarchy.
- Make sure the toggle at the top of the overlay reads Enabled.
- Drag the X, Y or Z sliders in the Shared Pivot section. The move / rotate / scale handles jump to the new position immediately.
- Rotate or scale the object: it now pivots around the new handle position.
Disabling the toggle restores Unity's default handle behaviour at any time. Your settings are kept, so re-enabling brings you right back to where you left off.
3 · Interface Overview
The overlay is organized into three areas: the master toggle, the Shared Pivot section, and the Object Pivots section. The numbered reference below covers every control.
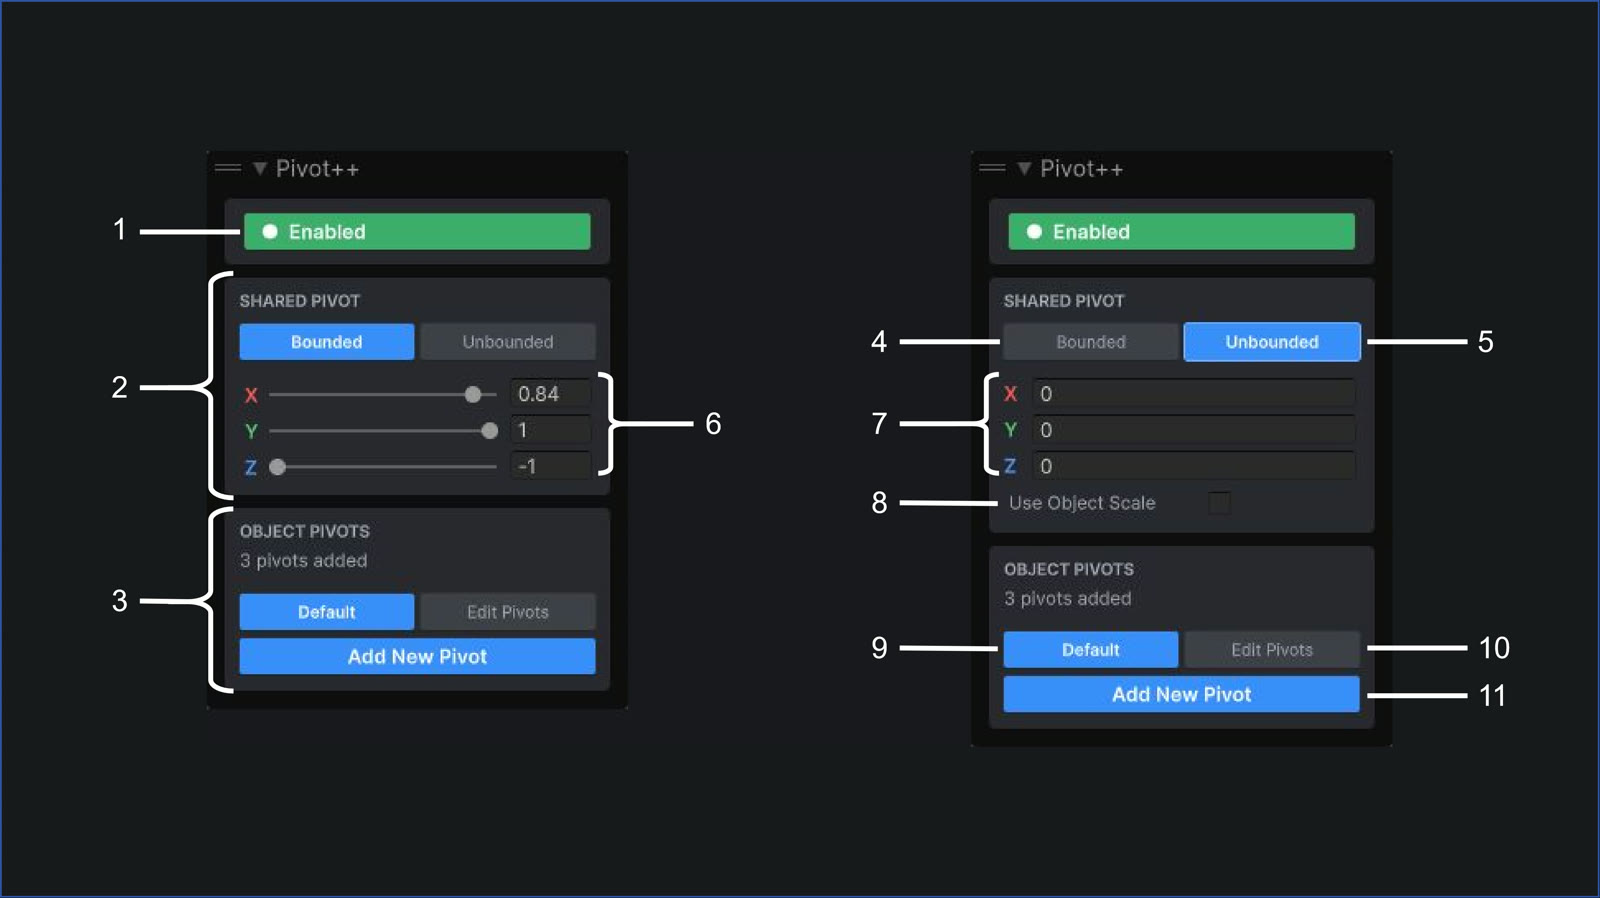
| # | Control | Description |
|---|---|---|
| 1 | Enabled / Disabled | Master toggle. Green (Enabled) means Pivot++ is overriding the transform handles; click it to fall back to Unity's default pivot without losing your settings. |
| 2 | Shared Pivot section | A quick, selection-wide pivot offset. Applies to whatever is currently selected and is shared across all objects. See section 4 of this document. |
| 3 | Object Pivots section | Per-object saved pivots. Create any number of custom pivots stored on the selected object. See section 5 of this document. |
| 4 | Bounded | Switches the Shared Pivot to Bounded mode: offsets are expressed relative to the object's bounds (−1 to 1). |
| 5 | Unbounded | Switches the Shared Pivot to Unbounded mode: offsets are fixed distances in the object's local space. |
| 6 | Bounded X / Y / Z sliders | Position of the shared pivot within the bounds on each axis. −1 is one face of the bounds, 0 is the centre, 1 is the opposite face. |
| 7 | Unbounded X / Y / Z fields | Exact local-space offset of the shared pivot from the object's centre, in scene units. |
| 8 | Use Object Scale | Unbounded mode only. When ticked, the offset is multiplied by the object's scale; when unticked, it is an absolute world-distance offset. |
| 9 | Default | When selected, the handles let you manipulate the object as usual. |
| 10 | Edit Pivots | When selected, handles let you move and rotate the saved pivots. You can also delete them. |
| 11 | Add New Pivot | Saves the current Shared Pivot position as a new permanent pivot on the selected object. |
When multiple pivots have been added to the selected object, the Object Pivots section also shows a counter (e.g. “3 pivots added”) so you always know how many custom pivots the object carries.
4 · The Shared Pivot
The Shared Pivot is the fast way to work: one offset, applied to whatever you have selected. It is called shared because the same offset carries from object to object as your selection changes. Great for repeat tasks like rotating a batch of doors around their hinges or scaling props from their base.
The Shared Pivot has two modes, chosen with the Bounded / Unbounded tab at the top of the section.
4.1 · Bounded offsets
Bounded mode (the default) positions the pivot relative to the bounds of the mesh. Each axis is a normalized slider from −1 to 1:
- −1 places the pivot at one end of the mesh on that axis.
- 0 places the pivot at the centre of the mesh.
- 1 places the pivot at the opposite end, whatever the mesh's actual size.
Because the values are proportional, the same setting adapts to every object. Set Y = −1 and the pivot sits at the bottom of a pebble and at the bottom of a skyscraper alike. Switch your selection between differently-sized objects and watch the pivot re-adjust itself automatically.
Bounded mode is ideal when you think in terms of the object's shape: “the base”, “the top-left corner”, “the left edge”. It is the recommended mode for day-to-day level design.
4.2 · Unbounded offsets
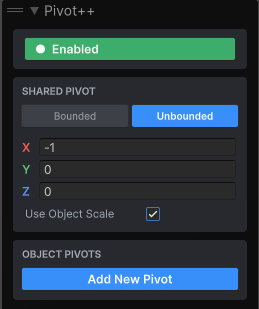
Unbounded mode places the pivot at a fixed distance in the object's local space, measured from the object's centre. Enter exact values into the X, Y and Z fields with no limits. You can place the pivot far outside the mesh if you need to, say to orbit a moon around a planet.
Use Object Scale toggle
- Ticked: the offset is multiplied by the object's local scale. An offset of 1 on a stretched object moves further on the stretched axis, keeping the pivot consistent with the object's proportions.
- Unticked: the offset is an absolute distance, unaffected by the object's scale.
Unbounded mode shines when you need precision or points outside the mesh: rotating around a world landmark, offsetting by an exact number of units, or matching a measurement from your DCC tool.
5 · Object Pivots
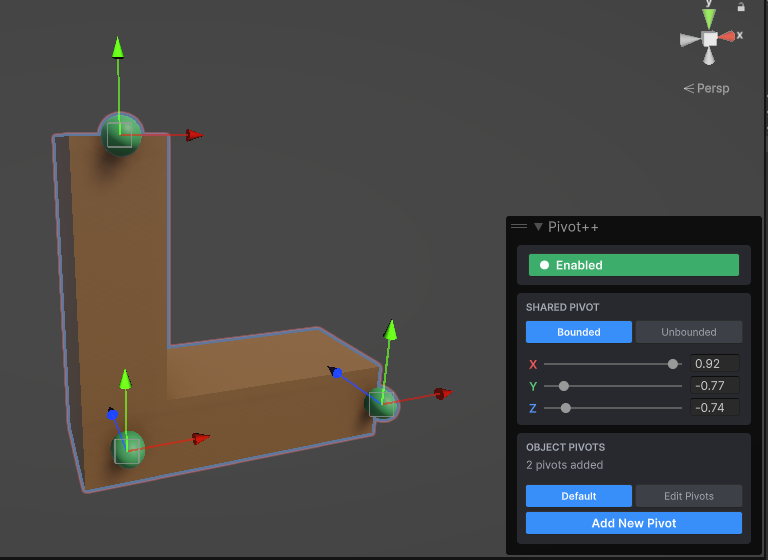
While the Shared Pivot is a single, selection-wide offset, Object Pivots are permanently available on a specific object. An object can hold any number of such pivots:
- A door can have a pivot on each hinge.
- An L-shape can have a pivot on every corner.
…and you can switch between them as you work.
5.1 · Adding a new pivot
- Using the Shared Pivot controls, position the pivot exactly where you want the new saved pivot to be.
- Click the Add New Pivot button at the bottom of the overlay window.
- A new pivot is created exactly where the shared pivot is.
The new pivot sits exactly where the shared pivot is. That gives you precise placement, but it can throw you off at first: the new handle and the shared pivot handle overlap perfectly, so it looks like nothing happened.
The counter in the Object Pivots section tells you how many extra pivots the object has. Repeat the steps to add as many pivots as the object needs.
5.2 · Edit Pivots mode
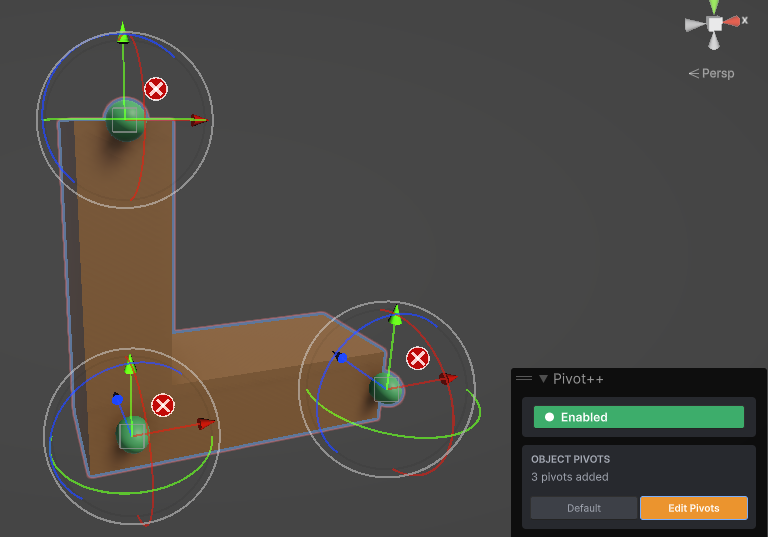
Click the Edit Pivots button to enter editing mode. Every saved pivot on the object is drawn in the Scene view with its own gizmo:
- Move. Drag a pivot's position arrows to relocate it.
- Rotate. Drag the rotation rings to orient the pivot.
- Delete. Click the red ✕ button next to a pivot to remove it from the object.
When you are done, click Default to leave editing mode and return to normal handle control.
1. Use the Global / Local toggle at the top-left of the Scene view to properly place & orient these pivots.
2. Edit mode supports Undo with Ctrl + Z.
3. Saved pivots stick through sessions. Set up once and reuse them forever.
6 · Tips & Troubleshooting
6.1 · Workflow tips
- Dock the overlay to an edge of the Scene view to keep it out of the way; collapse it from its ▾ header arrow when you need the space.
- Use Bounded mode for shape-relative work (bases, corners, edges) and Unbounded mode for exact distances or pivots outside the mesh.
- Keep the master toggle on Enabled and set the sliders to 0 when you want the original pivot. Or click the toggle to turn Pivot++ off entirely.
6.2 · Common questions
The overlay says “No object selected.”
Pivot++ needs an active selection to work with. Select a GameObject in the Scene view or Hierarchy and the controls will appear.
The overlay says “Selected object does not have any component to draw bounds from.”
Pivot++ only works on objects that have visuals: 3D models, Images and UI elements. If a GameObject and its children have no visible component, there is no “top-right” or “bottom-left” corner to go to, so Pivot++ shows you Unity's default handles.
I can't find Pivot++ in the Overlays menu.
Make sure the Scene view is focused when you press `, and look under the Custom foldout of the Overlays menu. If it is still missing, confirm the plugin imported without console errors and that your Unity version supports overlays (2022.3+).
The Pivot++ window is not visible, even after I enabled it in the Overlays menu.
Unity lets you disable all overlays in the Scene view. To re-enable them, open the Overlays menu (focus the Scene view and press `) and make sure the Enable Overlays toggle at the top of that window is ticked.
The handles don't move when I change the sliders.
The sliders only affect the Shared Pivot, not the object's saved pivots. If the handle doesn't react, you may be looking at one of the saved pivots while the shared pivot is elsewhere.
Does Pivot++ change my mesh or add components?
No. Pivot++ only overrides where the editor draws and applies the transform handles. Your mesh assets, import settings and runtime data are untouched.
7 · Support
If you run into a problem, have a feature request, or just want to share what you have built with it, we would love to hear from you.
Email: itsdevlogger@gmail.com
When reporting an issue, please include your Unity version and the plugin version. If you can, add a screenshot or short clip of the problem. It helps us get you a fix much faster.
Happy pivoting!